Here’s a draft article on “How to use Self-Hosted Lightning Node”:
Title: How to Use Self-Hosted Lightning Node with Bitcoin
Introduction:
As Bitcoin’s adoption increases, more users are looking for ways to take control of their own transactions and have greater financial autonomy. One way to achieve this is by using a self-hosted Lightning node, which allows you to create your own private network for peer-to-peer transactions without relying on a central authority or third-party provider. In this article, we’ll explore how to set up a self-hosted Lightning node with Bitcoin.
What is a Self-Hosted Lightning Node?
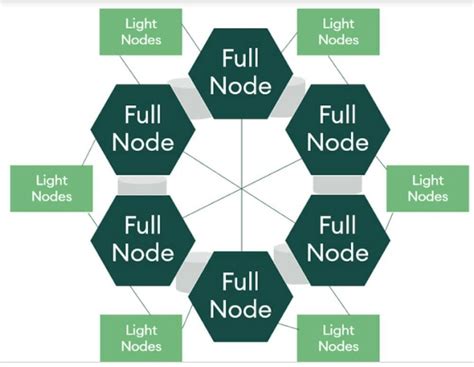
A self-hosted Lightning node is a software solution that enables users to create and manage their own private network for peer-to-peer transactions on the Bitcoin blockchain. Unlike traditional nodes that rely on a central authority, such as Bitcoin Core or Lightning Labs, a self-hosted node is entirely decentralized and run by individual users.
Why Use a Self-Hosted Lightning Node?
- Increased financial autonomy: With a self-hosted Lightning node, you have complete control over your transactions and can make them as private or public as you like.
- Improved security: Since the nodes are self-hosted, there’s no central authority to compromise the security of the network.
- Greater flexibility: Self-hosted Lightning nodes can be run on a variety of platforms, including desktops, laptops, or even servers.
Setting Up Electrum Personal Server:
To set up your own self-hosted Lightning node with Bitcoin, you’ll need to install and configure Electrum Personal Server. Here’s a step-by-step guide:
- Download the Electrum installer: Go to the official Electrum website and download the Electrum Personal Server installer.
- Run the installer: Follow the installation instructions to set up your new node.
- Configure the node: Once the installation is complete, configure your node by setting up a new wallet and creating a new Lightning account.
Setting Up the Lightning Node:
To create a self-hosted Lightning network, you’ll need to set up two nodes:
- Your main node: This will be the central node that stores the Bitcoin blockchain.
- Your peer-to-peer node:
This will be a separate node that creates and manages transactions between users.
Configuring the Peer-to-Peer Node:
- Create a new peer-to-peer account: Set up a new peer-to-peer account on your main node using Electrum Personal Server.
- Configure the peer-to-peer settings: Set up any necessary configurations for your peer-to-peer account, such as encryption or network settings.
Using Your Self-Hosted Lightning Node:
- Make a transaction: Use Electrum Mobile Wallet to create a new Bitcoin transaction and add it to your peer-to-peer network.
- Send the transaction: The transaction will be broadcast to the Bitcoin blockchain, where it can be verified by other nodes in the network.
Conclusion:
Setting up a self-hosted Lightning node with Bitcoin is a relatively straightforward process that requires some technical knowledge and configuration. However, once you’ve completed these steps, you’ll have complete control over your transactions and can enjoy increased financial autonomy and security. We hope this guide has been helpful in getting you started on your journey to creating a self-hosted Lightning network.
Note: This is just a basic guide, and there are many more configurations and settings that may be necessary depending on the specific use case. It’s always recommended to consult multiple sources and seek expert advice before setting up a new node or network.
Để lại một bình luận